

Installing an outdoor TV involves more decisions than mounting one indoors — wall material, wiring, weatherproofing, and cable management all behave differently outside. Getting these right the first time saves you from the most common and expensive mistakes: a mount that corrodes within a year, cables that fail from moisture, or a TV positioned where the sun makes it unwatchable.
This guide walks through the full process in sequence, from site selection to final weatherproofing. It assumes a permanent wall-mounted installation — the most common setup for residential outdoor TV use.
Step 1: Choose the Right Location
Location determines nearly everything else. Work through these factors before committing to a wall:
Sun exposure. Where does the sun hit the wall, and when? A west-facing wall gets intense afternoon sun — if that's your primary viewing time, you need a TV spec'd for it. An east-facing wall is in shade by mid-afternoon, which significantly reduces brightness requirements. Spend a few days observing the wall at different times before finalizing. See the nits guide for a full framework on matching brightness specs to sun exposure.
Viewing distance and angle. The center of the screen should sit at approximately eye level from your primary seating position. For loungers or deck chairs, that's typically 36–44 inches above the deck surface. For dining or standing positions, 48–60 inches. Measure from your most common seating position, not the wall itself. A full-motion mount lets you adjust after installation — worth the extra cost for most outdoor setups.
Power and cable access. Where is the nearest GFCI outlet, and what's the routing path for power and signal cables? Plan this before drilling — running cable after the mount is installed is significantly harder. If there's no existing outdoor outlet, budget for an electrician to install one before TV installation begins.
Wind and weather exposure. A covered roof protects against rain from above but not wind-driven moisture. Note the prevailing wind direction for your area — a wall that's downwind from typical storm direction gets significantly more rain exposure than one that's sheltered.
Step 2: Verify Your Wall and Select the Right Mount
Outdoor TVs are heavy — a 55-inch outdoor TV typically weighs 50–75 lbs, more than an equivalent indoor model. The mount and anchoring system must be rated for the combined weight of TV plus mount, with margin for wind load.
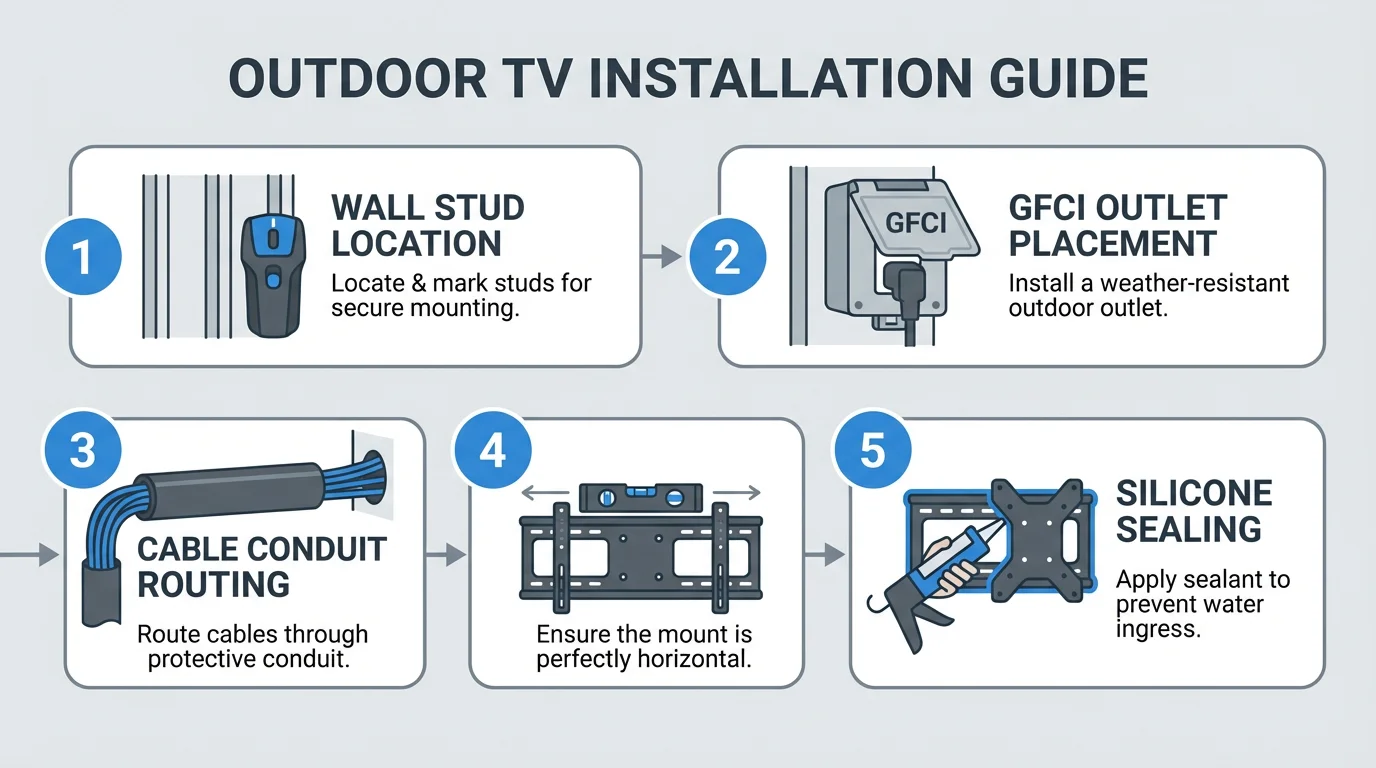
Wood stud walls: Standard lag bolts into studs are the baseline. Use a stud finder to locate two studs, verify with a small pilot hole, and use 3-inch lag bolts minimum. Studs are typically 16 inches on center in US residential construction.
Masonry (brick, concrete block, stucco over block): Requires a hammer drill and masonry bits. Use sleeve anchors rated for the TV weight — not plastic drywall anchors. Drill to the depth of the anchor plus 1/4 inch, blow out dust before inserting, and test each anchor before mounting the full bracket.
Stucco over wood framing: The stucco surface is not structural — you're anchoring into the wood framing behind it. Use a stud finder or probe carefully to locate the framing, and use long enough fasteners to reach solid wood past the stucco layer (typically 1–2 inches thick).
Mount selection: Use a mount with stainless steel or hot-dipped galvanized hardware throughout — standard zinc or cadmium-plated hardware corrodes within 1–2 years in outdoor environments. For coastal installs (within a few miles of saltwater), marine-grade stainless is the minimum. A full-motion mount is recommended for the flexibility to adjust sun angle and viewing position after installation.
Step 3: Plan and Run the Wiring
Wiring is where most DIY outdoor TV installs cut corners — and where most failures occur within the first year. Three separate runs are typically needed: power, signal (HDMI or coax), and any additional control cables.
Power. All outdoor TV installations require a GFCI-protected outlet. If you're near a pool, NEC 680 governs outlet placement — consult an electrician. For standard patio installs, an outdoor-rated GFCI outlet within reach of the TV is sufficient. The outlet itself must be rated for outdoor use (weather-resistant cover, in-use cover if the cord will be plugged in during rain).
Cable type matters. Use outdoor-rated cables throughout — not standard indoor HDMI cables run through a hole in the wall. Outdoor-rated HDMI cables have UV-resistant jackets and moisture-sealed connectors. For buried runs, use direct-burial rated cable. Standard cables exposed to outdoor conditions typically fail within 6–18 months from UV degradation and moisture ingress at connectors.
Conduit. Any cable running along an exposed surface should be run in conduit — PVC electrical conduit for most applications, metal conduit for areas where physical damage is possible. Conduit protects cables from UV, physical damage, and insects, and makes future cable replacement possible without opening walls.
Surge protection. Outdoor TVs are exposed to lightning risk — both direct strikes and induced surges from nearby strikes. A surge protector rated at 3,000 joules or higher is recommended. Some installers add a whole-home surge protector at the panel; a point-of-use surge protector at the TV is the minimum.
Seal all penetrations. Every hole where cable enters the wall or where the mount contacts the surface needs to be sealed with silicone sealant after installation. Water follows cables into walls — unsealed penetrations are a common source of structural moisture damage and cable failure over time.
Step 4: Install the Mount and TV
- Mark the mounting position. Use a level to mark the horizontal position of the mount bracket. Double-check that the marked position puts the TV center at your target eye level from the seating position — measure twice before drilling.
- Drill pilot holes. For wood: pilot holes slightly smaller than the lag bolt diameter. For masonry: hammer drill to the correct depth for your anchors. Blow out masonry dust before inserting anchors.
- Seal the holes. Apply silicone sealant around each hole before inserting fasteners. This prevents water from tracking into the wall structure via the fastener channel.
- Install the wall bracket. Use a level to verify alignment before final tightening. Tighten evenly across all fasteners — overtightening a single bolt can crack masonry or strip wood.
- Attach the TV. Most outdoor TV mounts use a two-piece system: the wall bracket and a plate that attaches to the TV's VESA pattern. Attach the VESA plate to the TV on a flat surface before lifting — it's significantly easier than trying to attach it with the TV suspended. Verify the VESA pattern of your specific TV matches the mount before purchase (common sizes: 200×200, 400×400 mm).
- Make connections. Connect HDMI, power, and any other cables before fully locking the TV in position, while access to the rear ports is easiest. Route cables through any cable management channels in the mount.
Step 5: Weatherproof and Finish
Seal all cable entry points where cables pass through the wall or enter the TV housing area. Use outdoor-grade silicone rated for the temperature range of your climate.
Install a weatherproof cover for when the TV is not in use — particularly if your install has any rain exposure. Covers protect the screen from dust, debris, insects, and moisture between viewing sessions. They're especially useful during extended non-use periods (winter off-season, extended travel).
Verify all port covers are seated. Outdoor TVs have rubber or plastic covers over unused ports. Ensure all unused ports are covered and seated properly — a single uncovered HDMI port in a rain-exposed location is enough to allow moisture ingress over time.
Test before finishing. Power on the TV and test all connections before final cable management and trim work. Fixing a missed connection is much easier before the conduit lids are snapped on and cable ties are in place.
Ongoing Maintenance
Outdoor TV installations require periodic checks that indoor installations don't:
- Every 6 months: Check all mount hardware for corrosion or loosening. Tighten any hardware that has shifted. Inspect silicone seals around cable penetrations and re-apply if cracking or shrinking.
- Annually: Inspect the cable jacket condition at exposed points. UV degradation shows as cracking or chalking of the outer jacket. Replace cables before they fail rather than after.
- After major storms: Check that all port covers are seated, no debris has accumulated in ventilation areas, and the mount hardware hasn't shifted.
- Screen cleaning: Use a soft microfiber cloth and a mild cleaner — avoid abrasives or standard glass cleaners, which can damage anti-glare coatings. Clean more frequently than indoors; outdoor screens accumulate pollen, dust, and insects faster.
Common Installation Mistakes (And How to Avoid Them)
Using indoor hardware outdoors. Standard zinc-plated bolts, indoor-rated HDMI cables, and non-GFCI outlets will all fail faster than the TV itself. The hardware investment is small relative to the TV cost — use outdoor-rated materials throughout.
Not sealing cable penetrations. This is the most common moisture ingress point in outdoor TV installations. Seal every hole, on both sides of the wall if accessible.
Mounting too high. People instinctively mount outdoor TVs at the same height as their indoor TVs — which is typically too high for seated outdoor viewing. Measure from your actual seating position before drilling.
Skipping a surge protector. Outdoor circuits are more exposed to lightning and power fluctuations than indoor circuits. A surge event can damage or destroy a TV that isn't protected — a $30–$50 surge protector is cheap insurance for a $1,500+ investment.
Underestimating cable management complexity. Running cables outdoors takes longer and involves more materials than indoors. Budget additional time and conduit before starting — improvised cable routing creates both aesthetic and weather-protection problems.
Summary
- Choose your location based on sun exposure and viewing angle before selecting specs or hardware
- Use stainless steel or galvanized mount hardware throughout — standard hardware corrodes quickly outdoors
- Run outdoor-rated cables in conduit; seal every wall penetration with silicone
- Power from a GFCI-protected outlet; use a surge protector rated at 3,000+ joules
- Check mount hardware and seals every 6 months; inspect cables annually
If you haven't yet chosen a TV, the 55-inch outdoor TV buyer's guide and the nits guide cover what to look for based on your specific install environment.
FAQ
Do I need a professional to install an outdoor TV?
The TV mounting itself is a manageable DIY project for someone comfortable with basic carpentry or masonry work. The electrical portion — especially installing a new GFCI outlet or running new outdoor circuit wiring — should be done by a licensed electrician in most jurisdictions. Permits may be required for new electrical work.
Can I use a standard indoor TV mount outside?
Not for a permanent outdoor installation. Indoor mounts use hardware that will corrode outdoors, typically within one to two seasons. A corroded mount is a safety risk as well as an aesthetic one. Use a mount rated for outdoor use with corrosion-resistant hardware.
How do I hide the cables on an outdoor TV installation?
PVC surface conduit (surface raceway) is the cleanest solution for exposed cable runs — it's available in paintable white or gray and snaps on without extensive wall work. For a cleaner look, cables can be run inside the wall between the TV location and the outlet, though this requires more planning and wall access. Buried runs for longer cable paths use direct-burial rated cable in conduit below grade.
What's the best height to mount an outdoor TV?
Mount the screen center at eye level from your primary seating position. For lounge chairs: 38–44 inches from the deck. For dining chairs: 46–54 inches. For standing/bar positions: 58–66 inches. Measure from your actual furniture, not from a generic standard — outdoor seating varies more than indoor furniture.

0 comments